

If someone would have told me three years ago that I’d one
day formulate a dog-friendly sweet potato pie recipe, I would have thought them
crazy—and that’s without any additional details. If they told me that I’d be
comfortably living with a man for over a year (while dating for almost 3) and
sharing two dogs together, I would have told them that they were crazy. Yet,
here were are… it’s funny where life takes us and how (oh how) time flies.
But c’est la vie.

If truth be told, I’ve been thinking about (and excited for)
this recipe for over two weeks…and was not disappointed with the final product
which is a fairly impressive, complete, bite-sized, sweet potato pie. Also, I know
if you’ve spied the recipe, you’re probably thinking I’m crazy (again);
however, if you keep reading here, you’ll see that it’s a really manageable process
that’s actually quite easy, fun, and ends up being somewhat extraordinary.
Plus, it’s the perfect little Thanksgiving treat for our four-legged friends.
Thanksgiving isn’t my favorite holiday for various reasons;
however, from a culinary stand point, it shouldn’t be overlooked. Fall flavors
like cinnamon, allspice and cloves are highlighted in several savory dishes and
desserts…and my dogs and I do love the flavors of fall. Plus, there are
wonderful fall fruits and vegetables like pumpkin and sweet potatoes that are
dog friends and healthy for our fur-babies.
 |
| Be sure to poke holes in the sweet potato prior to microwaving |
I suppose I could have just re-posted Jesse’s Salmon andSweet Potato muffins as those were a wonderful use of the vegetable in
question; but you know that’s not my style. Also, I didn’t want to post another
rollout or drop treat as that’s what I’ve posted the last few times. Plus,
Thanksgiving is the forgotten holiday (and if you doubt me, try to find
Thanksgiving-specific decorations after Halloween)—these treats definitely
needed to be special to mark the occasion.
Now, if you’ve looked over the recipe and think it’s a bear—don’t
despair. It’s easier than it sounds and everything is fairly forgiving—starting
with the crust which is a take on a shortbread piecrust that simply presses in
place. There’s no rolling, crimping or worrying about cracks or being nervous
that it won’t look perfect.
What is pie without a crust anyway? Well, that could be a
rather lengthy debate…myself, I do enjoy a nice flaky crust; but in general, I’m
satisfied with the cooler-section options as opposed to making one from
scratch. No, I usually don’t make my own pie crusts…I find them somewhat intimidating,
finicky, and I don’t notice that much of a difference in the taste when
compared with the effort it takes to pick one up at the grocery store.
 |
| Pie crust ingrients |
Even after having said all that, it shouldn’t come as a
shock to anyone to know that I made this one from scratch because it was for my
dogs—the shocking thing should be that I included one in this recipe. I mean,
when you think about it, the crust is mostly just empty calories and packed
with fat and added calories. A normal pie crust isn’t much more than fat and
flour—neither of which have all that much nutritional value.
Since I’ve been thinking about this treat for weeks, I had
time to mull it over. For these to be real pies, they need a crust…and for ease
of making and adapting, I settled on a shortbread style crust that I found at
MarthaStewart.com. Then in the past few days, I’ve been trying to decide on how
to convert that into something that’s not just empty calories. The solution was
to substitute an all-natural peanut butter for some of the fat.
 |
| You want the mixture to be slightly crumby |
It worked out really well because if you think about this
recipe independently with its various components then you’ll see that the pie
crust I’ve come up could almost be used as a treat by itself as could the
filling. The peanut butter adds not only fat but flavor and good protein; and
the spices make everything more aromatic. All in all, it made me feel better
about adding extra calories to what could have been a really low-calorie treat;
and yes, you could use all peanut butter or all coconut oil…if you were to ask
me though, I’d steer you toward the all peanut butter route as most dogs love
peanut butter.
 |
| pressed into the pan |
It will seem a bit dry; but again, the important thing is
that it presses together to form a dough which you’ll be doing when you put it
into the muffin pan. If you want bigger treats, you can use a standard-sized
cupcake pan; but the mini ones will be cuter. After the dough is pressed into
bottom and sides of the pan, then put it in the fridge to keep cool.
 Once your crusts are prepared, move onto the sweet potato
filling…and yes, you could easily cook your sweet potato first before making the
crusts to ensure that it has plenty of time to cool. However, if you’ve noticed
there’s only 1 egg white in the filling making it not that much of a concern
especially if you follow the order of ingredients. If there were more eggs, I’d
have a much stronger caution against mixing the eggs in before the sweet potato
is cool as you could end up cooking the eggs; but the bananas will help cool
the sweet potato anyway.
Once your crusts are prepared, move onto the sweet potato
filling…and yes, you could easily cook your sweet potato first before making the
crusts to ensure that it has plenty of time to cool. However, if you’ve noticed
there’s only 1 egg white in the filling making it not that much of a concern
especially if you follow the order of ingredients. If there were more eggs, I’d
have a much stronger caution against mixing the eggs in before the sweet potato
is cool as you could end up cooking the eggs; but the bananas will help cool
the sweet potato anyway.  |
| mashed up bananas |
The egg white was only added to the filling as I kind of
needed 1 ½ eggs to make the crust—and you can’t really half an egg…and I didn’t
want to waste the egg white. The spices are classic for a sweet potato pie—save
the allspice. Usually, there’s nutmeg involved; and in general, I’ve read that
nutmeg isn’t good for dogs. Cinnamon has anti-inflammatory properties, and
cloves can help with internal parasites—and from what I can tell, allspice is
fairly neutral…but increases that fall smell quite a bit. If you don’t have
cloves or allspice, I’d just swap out for more cinnamon.
Ordinarily I don’t add sugars or sweeteners; but I felt for
a special holiday treat, a little honey would be okay. As it’s only 1
tablespoon, you could omit it because it won’t make a difference to the end
product; but I liked adding it—and that’s the important part, right.
 |
| Sweet Potatoes mashed with the Bananas |
With the crust having a high fat content, I felt it
important to make the filling lower in fat; and besides, I had two very ripe bananas.
Bananas can be substituted for eggs which are usually an ingredient in sweet
potato or pumpkin pies; however, I know eggs firm up when cooked but wasn’t
quite sure how only using bananas would work in this case which is why there’s
tapioca flour/starch included. Like other starches (corn starch, arrow root—which
could be substituted), tapioca starch will thicken the mixture when it’s baked
to resemble an ordinary pie filling (FYI—just as a note, a friend of mine just shared
a paleo pumpkin pie recipe she has with me, which is eerily, unintentionally
similar to this one that does not use a starch to thicken at all, so I think you’ll
do fine without it).
Overall, the filling isn’t a runny as a pumpkin pie filling
would be (and I’ve never made a sweet potato pie myself, so I can’t make a
comparison there), but it works quite well in this recipe. When it’s all mixed,
you’ll spoon it into the chilled pie crusts. I filled mine completely; and it
took a full tablespoon per cup. Mine baked for 10 minutes at 425 degrees.

When I took them out of the oven, I let them cool for like
15 minutes in the pan; and then I used an offset spatula to help free them from
the cups. Mine didn’t stick at all as there’s plenty of fat in the crust; and I
wouldn’t spray the pans even if you’re worried—once they’re cool, they’ll slide
out easily—I only used the spatula as mine were flush to the top and I didn’t
want to invert the pan to get them out.
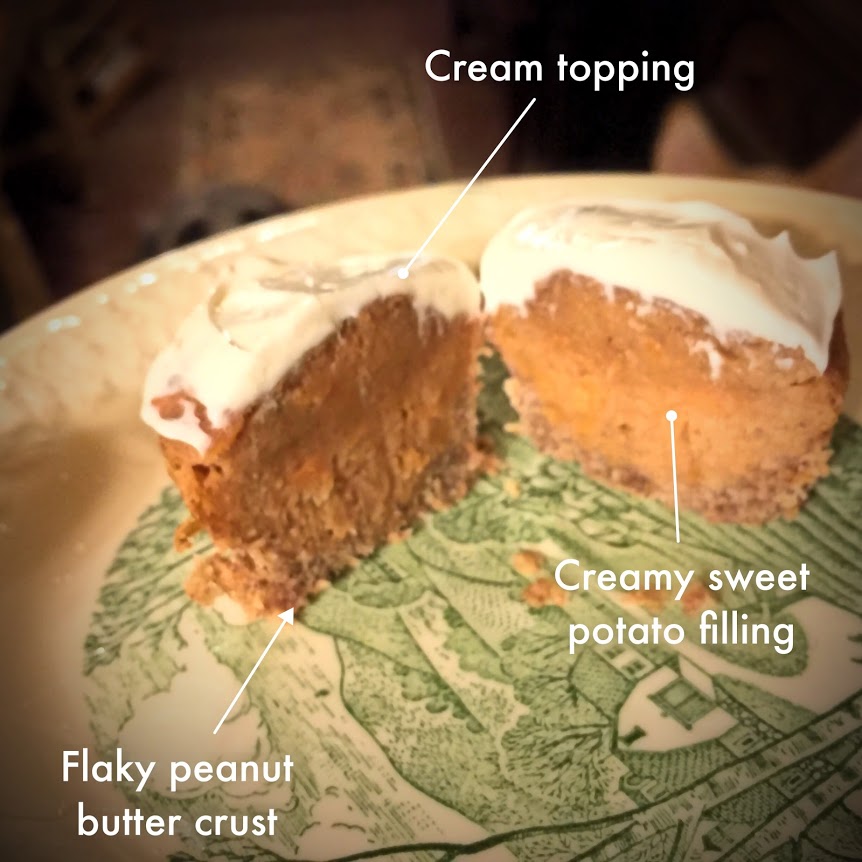
The topping ends up looking like whipped cream; and I suppose
you could use coconut cream to make your own version. Cream cheese is somewhat
dog safe; and I turned to a fat-free cream cheese to keep things lower in fat
overall. The tapioca starch is used since powdered sugar would be too much
added sugar; and the starch helps stabilize the cream cheese so it can be thinned
back out by the coconut milk. The tapioca starch sounds like a waste when I put
it like that, but it’s not—and if you try to mix the mix with the cream cheese
without it, good luck not ending up with a lumpy icing that doesn’t look appetizing.
 Now, I will say it’s completely optional to make the
topping; and if you don’t have tapioca starch, you can use corn starch…but
tapioca starch is a bit finer and will mix a little better… plus, it is a
little sweet. Just don’t use powdered sugar (too sweet) or flour (too pasty)…
Now, I will say it’s completely optional to make the
topping; and if you don’t have tapioca starch, you can use corn starch…but
tapioca starch is a bit finer and will mix a little better… plus, it is a
little sweet. Just don’t use powdered sugar (too sweet) or flour (too pasty)…
I actually made these in stages—the crust I made the night
before; so my boys didn’t really get all that excited by the process until they
were in the oven and the house smelled like fall. Also, I think because I was
using a muffin pan, they weren’t quite sure if these treats were for them or
not; but once they were presented with the finished product, they seemed happy
with the results.
 For me, the fact that this is really a pie treat impressed
me. I mean, the filling remained soft like a traditional pie with the crust
getting a little firm. Then the final flourish of the topping made it even more
over the top; and I had actually went through the trouble to pipe it on but
decided that I liked the look better to just spread a little on each one—and for
storage, that’s the way I’d suggest going as a huge dollop won’t set and will
be a big ole mess.
For me, the fact that this is really a pie treat impressed
me. I mean, the filling remained soft like a traditional pie with the crust
getting a little firm. Then the final flourish of the topping made it even more
over the top; and I had actually went through the trouble to pipe it on but
decided that I liked the look better to just spread a little on each one—and for
storage, that’s the way I’d suggest going as a huge dollop won’t set and will
be a big ole mess.  |
| More than a little curious |
As I plan to share most of these treats (and have already—the
lady
who rents our house next door has the sweetest little dog who’s been the recipient
of several treats), I’ve moved all of mine to the fridge in a container; but
the icing did set meaning these would be fine for a plastic baggie and the
freezer for long-term storage.
If you haven’t already, check out the recipe below (or clickhere) and make these for a Thanksgiving or anytime treat for your own furbaby!
As always, please email me with any questions or comments or leave them in the
contacts—or by using the social media links at the top right of the page; and
please be sure to follow Jesse on twitter @jdawg_yellow
Thanks for reading!!
